How to build custom plugins in QGIS

When I needed to change a part on my 4WD expedition truck, there was no spanner known to man that could get the job done. So, I welded one up out of scrap material I had laying around, and while it wasn’t pretty, it did the job. Now, whenever I need to undo that part again, I have it in my toolbox.
The great news is that we can do the same thing with mapping software!
QGIS, a free and open source Geographic Information System, has a lot of inbuilt tools – but sometimes there isn’t an elegant way to achieve what you want using only these tools. For instance, you might have a repetitive task to do, or have the same sequence of geospatial processing for some common analysis that you need to run day in and day out. But there’s good news: these tasks can be scripted using the PyQGIS Python library.
What is PyQGIS?
is a Python library we use to talk to the QGIS application. It connects to the interface itself, including the buttons, menus and data layers. PyQGIS also allows us to connect to the background processing algorithms included in QGIS.
More specifically, we can:
- Customise the QGIS User Interface (UI)
- Add and remove layers
- Change which layers are visible
- Programmatically change symbology
- Edit the geometry of features
- Edit attribute tables of layers
- Run geoprocessing tools with complete control of inputs, outputs and parameters
- Access data from other Web APIs and add it to new layers in your project
How do we use this PyQGIS thing?
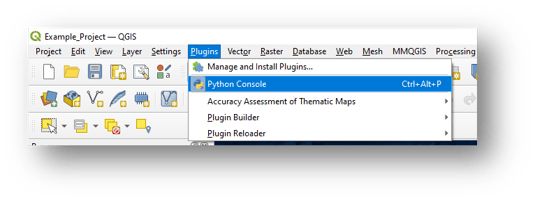
There are a few ways to use PyQGIS. To start exploring, open the Python Console within QGIS. The PyQGIS library will be automatically imported for you:
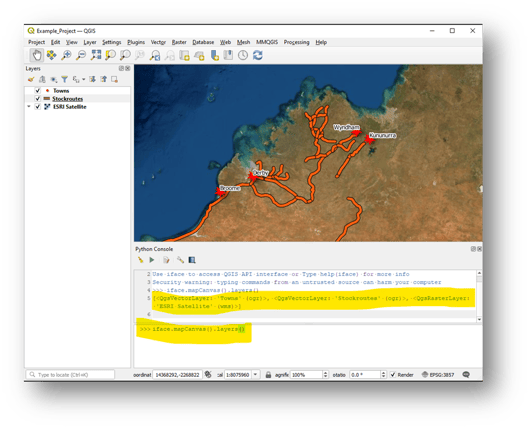
In this example, I typed iface.mapCanvas().layers() to get a list of the layers in my map canvas. This is extremely useful in scripts, which are a series of Python commands. Thankfully, QGIS also comes with a Python script editor – which allows us to chain together a series of commands and run them. These scripts can be saved and uploaded into different QGIS projects, which makes daily workloads a little bit faster and seamless:

In this example, I used PyQGIS to get the name of the active layer and the number of features in the active layer. I then displayed this to the user in a message. The commands are:
layer = iface.activeLayer()
layerName = layer.name()
featureCount = layer.feautreCount ()
iface.messageBar().pushMessage(f’Thelayer {layerName} has {featureCount} features.’)
Here are some steps I followed to get here:
- I stored a reference to the active layer object in a variable called ‘layer’
- I used the layer reference to get the name of this layer and store it in a variable called ‘layerName‘
- I used the layer reference once again to get the number of features using the featureCount() method, and store that into a variable called featureCount
- Finally, I used string interpolation to make a display message for the user on the QGIS interface.
These little scripts are the best way to start experimenting with PyQGIS. But the cool thing is that they are also the building blocks of plugins. Plugins include custom Python scripts, but they appear in our QGIS application as a clickable tool button and can have a fully customised Graphical User Interface (GUI).
Let’s decide what we want to automate. What does our tool need to do? What functions in the PyQGIS library can help us achieve that?
Tip 1: Test the PyQGIS functions we must use in the QGIS Python Console.
My first tip will help you to see how to use the functions. Specifically, you must experiment with them to determine what arguments you must provide to the tasks and what data they return. So, try out your PyQGIS functions in the console. Test each PyQGIS operation you want to use in your code, but test them in the console and try to manipulate the application. You will quickly learn how each one works before things become complex.
Let’s say we have a plan figured out and know what PyQGIS functions we need to use. But how do we then incorporate these functions into the plugin code? Enter tip two.
Tip 2: Install the QGIS Builder plugin. This will generate a boilerplate or skeleton code for your plugin.
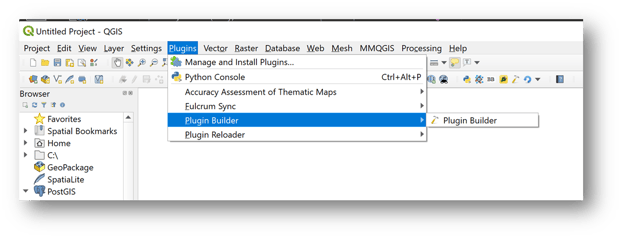
Follow the prompts in the dialogue box, and save the code it generates to your local QGIS plugins folder. I put mine here:
C:/Users/username/AppData/Roaming/QGIS/QGIS3/profiles/default/python/plugin/HERE
There are many files within the generated boilerplate, but don’t be intimidated; you only need to edit two. This is what the file structure looks like:
We will put all of our working Python code in the file called `example_plugin.py`. Don’t worry about this for now; before we continue with PyQGIS functions, we need to do some work on the plugin’s user interface first! To do that, we edit the `example_plugin_dialog_base.ui` file.
The GUI
The GUI of a plugin is built using Qt. Qt is a cross-platform framework for UI development on QGIS, so it is handy to know.
We need to edit the file called `example_plugin_dialog_base.ui`. We could edit this in code, but I find creating user interface items graphically with the Qt editor easier.
On Windows, the OSGEO4W installer comes with a copy of Qt Designer, but on Mac, you need to download and install this separately. On Linux, I have only used Qt Creator, a more feature-rich version of the software that works just as well.
Once you have Qt installed, open the example_plugin.ui file in Qt Designer. Here are my tips for the GUI design component:
- Put everything in a grid! This helps with resizing and different screen resolution
- Rename the object name for each element to something that makes sense to you
- Make use of the QGIS Custom Widgets that come with the OSGEO4W installer
- Adding images and logos can be tricky. See this link for help and assistance.
- After making changes, save the .ui file, find and install the ‘plugin reloader’ plugin in QGIS, and check your changes
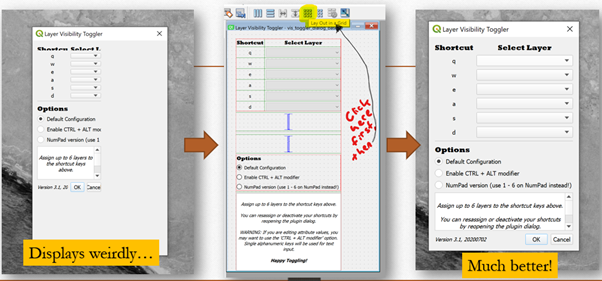
- Use a Top Level Layout (see below)
Using a ‘Top Level Layout’ means that all of your GUI content (including any grids) is locked into a global container and will deal with any resizing of the plugin window and different screen resolutions.
Python Code
Almost all of the code for editing will be in the file called example_plugin.py.
I use a free Integrated Development Environment (IDE) called Visual Studio Code to edit this file, but use any text editor or IDE you are comfortable with. You can’t efficiently run or debug the file within Visual Studio Code anyway, so we mostly use it as a text editor with some nice highlighting.
The basic workflow is to make some changes to this file, and then open the plugin in QGIS and see your changes’ results.
Tip 4: After each change in your plugin, use the ‘plugin reloader’ to reload it and test straight in QGIS.
Regarding the boilerplate, most of your code will go to the bottom of the example_plugin.py file. All the main running code will go in the run(self) method. I generally put my other custom methods above this. Here is an example:
This shows how the first time the plugin is run, the Dialog will be instantiated. We also do some tricky button disconnect if the plugin is loaded a second time to avoid things happening twice that shouldn’t – you will learn these tricks as you go along, don’t worry! We then check to see if we have saved our API key in memory, something specific to the plugin I built. We then go through and connect all the buttons in the UI to the particular methods that we want them to trigger. Then we show the Dialog! Here are some specific methods I have put above the run(self) method.
For example, when you click the button on the UI called forgetButton, this will call the forgetApiKey() method. Does it start to make sense?
Tip 5: You should really consider modularising your code so that you can have the UI buttons call discrete methods that do specific things.
For example, I have the following custom methods in this Fulcrum plugin I made.
Tip 6: Use the Python console to test your custom methods.
You can interact with any active plugins in a QGIS project using PyQGIS and the Python console. All you have to do is store a reference to the plugin in a variable then call the plugin’s methods to test them. This is where you can save a reference to the plugin in a variable called `plug`:
Now, you can call any custom methods you made from the console using the syntax `plug.method(parameters)`. This isolates the Python code from the UI, which is useful for testing and, personally, saves me a lot of time.
Finally, I’d like to share some links to set you on the right path to develop your QGIS plugins. Good luck!
Tip 7: Pathway to QGIS plugin development success
- This course for building a Python plugin is straightforward and covers a lot of this blog: https://www.qgistutorials.com/en/docs/3/building_a_python_plugin.html
- Then go through this to learn PyQGIS library in more detail: https://courses.spatialthoughts.com/pyqgis-in-a-day.html
- Refer to the docs if you get stuck: https://qgis.org/pyqgis/3.0/
- Set up a GIS StackExchange account and ask for advice here: https://gis.stackexchange.com/
- For more in-depth learning, check this out next: https://docs.qgis.org/3.16/en/docs/pyqgis_developer_cookbook/index.htm
Want to brush up on your QGIS skills?
To get the most from QGIS, it is worth taking a training course to keep your skills sharp.
NGIS offers training for the fundamentals of QGIS and QGIS for local government. The one-day courses cover all the necessary skills to begin creating, editing and managing the software, setting you up to unleash the power of QGIS for your next geospatial project.
Read about our QGIS courses here.
Related Articles
Here are more related articles you may be interested in.

